This post is sponsored by Adobe
As a new school year begins and kids are settling into their routine, back to school for parents means dealing with endless school forms. What seems to be a constant influx of health forms, emergency contact forms, field trip permission slips, and more, probably has you thinking how does one keep up with all this paperwork? Recalling dates of vaccinations for health forms isn’t ever easy nor is remembering which friends and neighbors are listed on Student Emergency Information forms.
If you’re dreading the paperwork that comes with sending kids back to school, now is the perfect time to implement simple practices that will help you to get organized and stay organized throughout the year. Adobe Document Cloud features essential products, such as Adobe Scan, that helps eliminate paper overload by transforming documents into searchable PDFs that can be accessed through the cloud whenever you need them.
Adobe Scan allows me to capture physical documents using my phone’s camera. Once an image is captured I can crop and adjust the scan, and transform them into searchable PDFs in seconds. It’s easy to learn and available for iOS and Android devices, this app helps busy parents maximize their productivity and be more efficient, so we can spend more time doing the things we love.
Organize Back to School Paperwork with Adobe Scan in 6 Easy Steps

After you download the free Adobe Scan app, here’s how you can use it to get organized this year so next year’s back to school paperwork is a breeze.
- Assemble your school forms and open the Adobe Scan app.

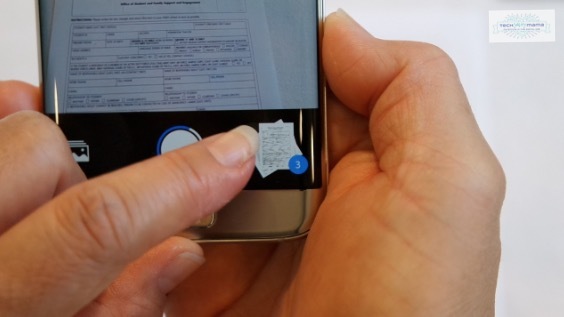
- Tap the camera icon and you’ll notice that Adobe Scan automatically finds the document you want to capture, or you can take a photo of the document yourself. Don’t worry if it’s not perfect! You can edit it easily in one of the next steps.

- In the lower right corner of the screen, you’ll see thumbnails of the pages you captured electronically. Tap on them to preview.

- Edits can be made easily by dragging your finger across the screen to crop or straighten the form to make the form look exactly like you want. When you’re finished, simply click the checkmark.

- Before you tap Save PDF, tap on the Pencil icon next to the date of your scan. This will allow you to change the name of your electronic document so you can give it a name you’ll remember later that will be easy to find.

- After renaming your document, tap Save PDF in the upper right corner. Now you can access it via the app or Adobe Acrobat Reader on your desktop, laptop, or tablet.

If you’re a visual learner, this video I made will walk you through the above steps. Feel free to pause, rewind, and rewatch it. Once you get the hang of Adobe Scan, you’ll wish you had known how easy it was to use sooner!
Having forms on your Adobe Scan App enables you to access the information you need right away or edit the form for the following year. Having documents stored in Adobe Document Cloud provides constant access to important files and forms, regardless of where you are or what device is nearby.
Adobe Acrobat DC is available as a standard or pro subscription for individuals and multi-licenses can be purchased by businesses for team use. This helpful chart can assist you in figuring out what features and version is best to streamline your workflow and ensure efficiency from anywhere you may be working.
For more information about Adobe Document Cloud:
- Visit the Adobe Acrobat DC website
- Download Adobe Scan from the iTunes Store or Google Play
- Read the Adobe Acrobat DC blog
- Follow @AdobeDocCloud on Twitter
For more practical tips on using Adobe Document Cloud tools to keep work, family, and home life organized, read my posts here:
- 8 Ways Working Parents Can Declutter and Get More Organized
- 7 Ways Technology Can Help Parents Organize Home and Family Life
This post and the accompanying video was sponsored by Adobe Document Cloud but all opinions are my own and based on personal opinion.


What an amazing article!